
This guide helps alumni use classic Outlook to back up calendars and contacts from their CEIBS email account and import them into their personal or alumni email accounts.
Applicable for Outlook 2016/2019/2021/2024/M365
Important:
The following instructions require the use of classic Outlook. If you're unsure about which version of Outlook you are using, please refer to this link.
To find out whether your Outlook for Windows is the new or classic version, look for the Settings in the top right corner. If you have the Settings button, you have the new Outlook. If the Settings button is missing, you're using classic Outlook.
Back up Calendar or Contacts:
If the account you want to export isn't already added to the desktop version of classic Outlook, add the email account you want to export. Once the account and all the contents are added to Outlook, you can begin the export process.
-
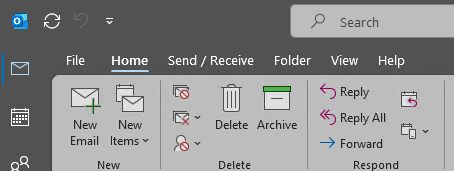
At the top of the ribbon in classic Outlook, choose File.
-
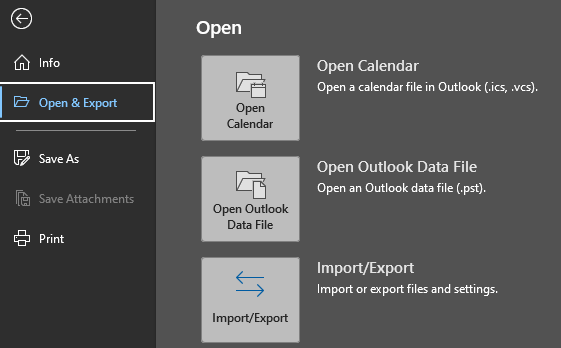
Choose Open & Export > Import/Export.
-
Choose Export to a file > Next.
-
Click Outlook Data File (.pst) > Next.
-
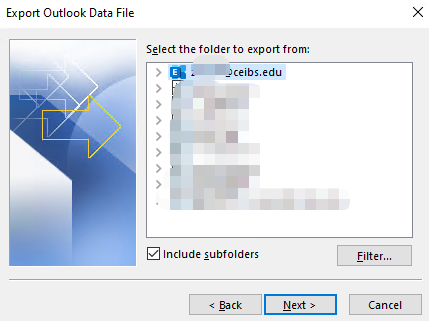
Select the email account name (please make sure to select the CEIBS email account) to export. Only information for one account can be exported at a time.
Make sure that the Include subfolders check box is selected. This ensures that everything in the account will be exported: Inbox, Calendar, Contacts, and Tasks. Choose Next.
-
Click Browse to select where to save the Outlook Data File (.pst). Enter a file name, and choose OK to continue.
Note: If you've used export before, the previous folder location and file name appear. Type a different file name before choosing OK.
-
If you are exporting to an existing Outlook Data File (.pst), under Options, specify what to do when exporting items that already exist in the file.
-
Choose Finish.
-
Outlook begins the export immediately unless a new Outlook Data File (.pst) is created or a password-protected file is used.
-
If you're creating an Outlook Data File (.pst), an optional password can help protect the file. When the Create Outlook Data File dialog box appears, enter the password in the Password and Verify Password boxes, and choose OK. In the Outlook Data File Password dialog box, enter the password, and choose OK.
-
If you're exporting to an existing Outlook Data File (.pst) that is password-protected, in the Outlook Data File Password dialog box, enter the password, then choose OK.
-
- End of guide.
After your email data is exported to a .pst file, it's portable! You can import it to other email accounts.
Restore Calendar or Contacts:
-
At the top of your Outlook ribbon, select File.
-
Select Open & Export > Import/Export. This starts the Import/Export wizard.
-
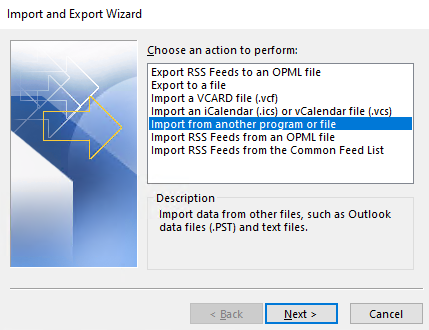
Select Import from another program or file, and then select Next.
-
Select Outlook Data File (.pst) and select Next.
-
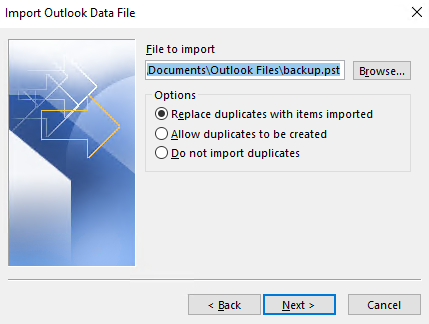
Browse to the .pst file you want to import. Under Options, choose how you want to deal with emails and contacts, then choose Next.
-
If a password was assigned to the Outlook Data File (.pst), enter the password, and then select OK.
-
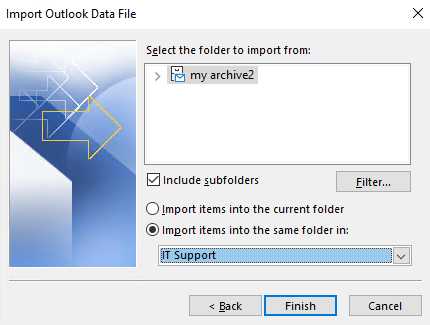
If you're importing the contents of your .pst file into your Microsoft 365 mailbox, choose that mailbox here.
If you're NOT importing into your Microsoft 365 mailbox, choose Import items into the current folder. This imports the data into the folder currently selected.
-
Choose Finish. Outlook starts importing the contents of your .pst file immediately. When the progress box disappears, the import is finished.
- End of guide.
If you're importing your .pst file to your Microsoft 365 mailbox, you may see a message that it's trying to connect with Microsoft 365. This happens when the Internet connection is interrupted, even for a moment. Once your Internet connection is re-established, Outlook will continue importing the .pst file.